
Welcome Defender! As an incident responder we're granting you access to the AWS account called "Security" as an IAM user. This account contains a copy of the logs during the time period of the incident and has the ability to assume into the "Security" role in the target account so you can look around to spot the misconfigurations that allowed for this attack to happen.
The Defender track won't include challenges like the Attacker track, and instead will walk you through key skills for doing security work on AWS.
For the writeups and notes to the other flAWS challenges:
This post is mostly based on the instructions from the website, with my notes and comments here and there.
Before starting, I wanted to say thank you again to the creator of these games, Scott Piper of summitroute for the effort of designing, hosting and making them available for free for everyone! All the levels are highly educative and recommended for anyone interested in AWS security.
Scenario
IAM credentials are provided for the Security account:
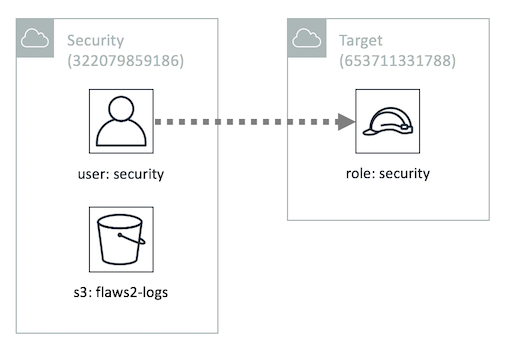
The credentials above give you access to the Security account, which can assume the role "security" in the Target account. You also have access to an S3 bucket, named flaws2_logs, in the Security account that, that contains the CloudTrail logs recorded during a successful compromise from the Attacker track.
And a diagram of the roles and accounts involved:
Objective 1: Download CloudTrail logs
Check the profile and list all the buckets available:
~ aws --profile defender sts get-caller-identity
{
    "Account": "322079859186",
    "UserId": "AIDAJXZBU42TNFRNGBBFI",
    "Arn": "arn:aws:iam::322079859186:user/security"
}

~ aws --profile defender s3 ls
2018-11-19 20:54:31 flaws2-logs
Next, download everything in that bucket:
~ aws --profile defender s3 sync s3://flaws2-logs .
The CloudTrail logs for the hack are in the subfolder AWSLogs/653711331788/CloudTrail/us-east-1/2018/11/28/
Objective 2: Access the Target account
Add a profile for the Target security role in ~/.aws/config:
[profile target_security]
region=us-east-1
output=json
source_profile = defender
role_arn = arn:aws:iam::653711331788:role/security
Now check the identity again:
~ aws --profile target_security sts get-caller-identity
{
    "Account": "653711331788",
    "UserId": "AROAIKRY5GULQLYOGRMNS:botocore-session-1572880759",
    "Arn": "arn:aws:sts::653711331788:assumed-role/security/botocore-session-1572880759"
}
The Target account has access to the buckets for the levels of the Attacker track:
~ aws --profile target_security s3 ls
2018-11-20 19:50:08 flaws2.cloud
2018-11-20 18:45:26 level1.flaws2.cloud
2018-11-21 01:41:16 level2-g9785tw8478k4awxtbox9kk3c5ka8iiz.flaws2.cloud
2018-11-26 19:47:22 level3-oc6ou6dnkw8sszwvdrraxc5t5udrsw3s.flaws2.cloud
2018-11-27 20:37:27 the-end-962b72bjahfm5b4wcktm8t9z4sapemjb.flaws2.cloud
Objective 3: Use jq
First unzip all the log files:
~ find . -type f -exec gunzip {} \;
The cat all of them through jq:
~ find . -type f -iname "*.json" -exec cat {} \; | jq '.'
To see just the event names print the eventName field nested under Records:
~ find . -type f -iname "*.json" -exec cat {} \; | jq '.Records[]|.eventName'
Let’s play a bit with jq parameters to include the timestamp as well, display a compact output (-cr), convert it to tsv (@tsv) and sort the events by date:
~ find . -type f -iname "*.json" -exec cat {} \; | jq -cr '.Records[]|[.eventTime, .eventName] |@tsv' | sort
Get more information and dump them to a tsv file for visual inspection:
~ find . -type f -iname "*.json" -exec cat {} \;
| jq -cr '.Records[]|[.eventTime, .sourceIPAddress, .userAgent, .userIdentity.arn, .userIdentity.accountId, .userIdentity.type, .eventName]|@tsv'
| sort > events.tsv
We could have dumped them similarly to a CSV file using @csv operator.
Objective 4: Identify credential theft
List only the ListBuckets events:
~ find . -type f -iname "*.json" -exec cat {} \; | jq '.Records[]|select(.eventName=="ListBuckets")'
There is only one call, coming from level3 user:
{
  "eventVersion": "1.05",
  "userIdentity": {
    "type": "AssumedRole",
    "principalId": "AROAJQMBDNUMIKLZKMF64:d190d14a-2404-45d6-9113-4eda22d7f2c7",
    "arn": "arn:aws:sts::653711331788:assumed-role/level3/d190d14a-2404-45d6-9113-4eda22d7f2c7",
    "accountId": "653711331788",
    "accessKeyId": "ASIAZQNB3KHGNXWXBSJS",
    "sessionContext": {
      "attributes": {
        "mfaAuthenticated": "false",
        "creationDate": "2018-11-28T22:31:59Z"
      },
      "sessionIssuer": {
        "type": "Role",
        "principalId": "AROAJQMBDNUMIKLZKMF64",
        "arn": "arn:aws:iam::653711331788:role/level3",
        "accountId": "653711331788",
        "userName": "level3"
      }
    }
  },
  "eventTime": "2018-11-28T23:09:28Z",
  "eventSource": "s3.amazonaws.com",
  "eventName": "ListBuckets",
  "awsRegion": "us-east-1",
  "sourceIPAddress": "104.102.221.250",
  "userAgent": "[aws-cli/1.16.19 Python/2.7.10 Darwin/17.7.0 botocore/1.12.9]",
  "requestParameters": null,
  "responseElements": null,
  "requestID": "4698593B9338B27F",
  "eventID": "65e111a0-83ae-4ba8-9673-16291a804873",
  "eventType": "AwsApiCall",
  "recipientAccountId": "653711331788"
}
The call came from the role level3. Let’s inspect this role:
~ aws --profile target_security iam get-role --role-name level3

{
    "Role": {
        "Description": "Allows ECS tasks to call AWS services on your behalf.",
        "AssumeRolePolicyDocument": {
            "Version": "2012-10-17",
            "Statement": [
                {
                    "Action": "sts:AssumeRole",
                    "Principal": {
                        "Service": "ecs-tasks.amazonaws.com"
                    },
                    "Effect": "Allow",
                    "Sid": ""
                }
            ]
        },
        "MaxSessionDuration": 3600,
        "RoleId": "AROAJQMBDNUMIKLZKMF64",
        "CreateDate": "2018-11-23T17:55:27Z",
        "RoleName": "level3",
        "Path": "/",
        "Arn": "arn:aws:iam::653711331788:role/level3"
    }
}
According to the description, this should only be run by ECS services because the AssumeRolePolicyDocument is only allowing that one principle. But that 104.* IP address clearly doesn’t come from AWS!
Normally, we would see the resource (the ECS in this case) having made AWS API calls from its own IP that we could then compare against any new IPs.
Objective 5: Identify the public resource
There is a call to ListImages done by level2 username:
~ find . -type f -iname "*.json" -exec cat {} \; | jq '.Records[]|select(.eventName=="ListImages")'

{
  "eventVersion": "1.04",
  "userIdentity": {
    "type": "AssumedRole",
    "principalId": "AROAIBATWWYQXZTTALNCE:level1",
    "arn": "arn:aws:sts::653711331788:assumed-role/level1/level1",
    "accountId": "653711331788",
    "accessKeyId": "ASIAZQNB3KHGIGYQXVVG",
    "sessionContext": {
      "attributes": {
        "mfaAuthenticated": "false",
        "creationDate": "2018-11-28T23:03:12Z"
      },
      "sessionIssuer": {
        "type": "Role",
        "principalId": "AROAIBATWWYQXZTTALNCE",
        "arn": "arn:aws:iam::653711331788:role/service-role/level1",
        "accountId": "653711331788",
        "userName": "level1"
      }
    }
  },
  "eventTime": "2018-11-28T23:05:53Z",
  "eventSource": "ecr.amazonaws.com",
  "eventName": "ListImages",
  "awsRegion": "us-east-1",
  "sourceIPAddress": "104.102.221.250",
  "userAgent": "aws-cli/1.16.19 Python/2.7.10 Darwin/17.7.0 botocore/1.12.9",
  "requestParameters": {
    "repositoryName": "level2",
    "registryId": "653711331788"
  },
  "responseElements": null,
  "requestID": "2780d808-f362-11e8-b13e-dbd4ed9d7936",
  "eventID": "eb0fa4a0-580f-4270-bd37-7e45dfb217aa",
  "resources": [
    {
      "ARN": "arn:aws:ecr:us-east-1:653711331788:repository/level2",
      "accountId": "653711331788"
    }
  ],
  "eventType": "AwsApiCall",
  "recipientAccountId": "653711331788"
}
We can check the policy of ECR repository for level2:
~ aws --profile target_security ecr get-repository-policy --repository-name level2

{
    "policyText": "{\n  \"Version\" : \"2008-10-17\",\n  \"Statement\" : [ {\n    \"Sid\" : \"AccessControl\",\n    \"Effect\" : \"Allow\",\n    \"Principal\" : \"*\",\n    \"Action\" : [ \"ecr:GetDownloadUrlForLayer\", \"ecr:BatchGetImage\", \"ecr:BatchCheckLayerAvailability\", \"ecr:ListImages\", \"ecr:DescribeImages\" ]\n  } ]\n}",
    "repositoryName": "level2",
    "registryId": "653711331788"
}
And if we clean the policyText field:
~ aws --profile target_security ecr get-repository-policy --repository-name level2 | jq '.policyText|fromjson'

{
  "Version": "2008-10-17",
  "Statement": [
    {
      "Sid": "AccessControl",
      "Effect": "Allow",
      "Principal": "*",
      "Action": [
        "ecr:GetDownloadUrlForLayer",
        "ecr:BatchGetImage",
        "ecr:BatchCheckLayerAvailability",
        "ecr:ListImages",
        "ecr:DescribeImages"
      ]
    }
  ]
Here Principal: * means these actions are public to the world to perform!
Objective 6: Use Athena
Athena is great for incident response because you don’t have to wait for the data to load anywhere, just define the table in Athena and start querying it.
References
Posts
- Securing AWS Credentials on Engineers’ Machines
- Your single AWS account is a serious risk
- Partitioning CloudTrail Logs in Athena