The challenge for this edition of SecTalks includes a good mix of topics: encryption, JavaScript obfuscations and interesting custom steganography. Something for everyone. Since my solution is a bit different than the winning solution I’ve decided to post it here, hoping it will be useful. Not knowing much about how images are loaded in HTML as base64 encoded data, I went for a brute-force approach, which actually worked quite well. But more on this later. Let’s download the page and get started!
Stage 0
After unzipping the file, we have the following long HTML page, containing just the body element:
<body onload="a=String.fromCharCode;String.prototype.b=String.prototype.charCodeAt;Number.prototype.c=Number.prototype.toString;key=prompt('Enter the key');document.body.innerHTML='<img src='+[23, 4, 23, 2, [...], 4, 78].map((e,i)=>a(e^key[i%10].b(0).c(10))).join('')+' />';"></body>
Upon loading, we see a short JavaScript being loaded. Let’s arrange it a little bit to understand what it does:
a = String.fromCharCode;
String.prototype.b = String.prototype.charCodeAt;
Number.prototype.c = Number.prototype.toString;
key = prompt('Enter the key');
document.body.innerHTML='<img src='+[23, 4, 23, 2, [...], 4, 78].map((e,i)=>a(e^key[i%10].b(0).c(10))).join('')+' />';
We see that the prototypes of String and Number classes are extended in order to obfuscate what functions are being called. An image is then loaded and we have to find out what it is. After untangling the code, the JavaScript bit becomes clearer:
[23, 4, 23, 2, [...], 4, 78].map((elem,idx)=>String.fromCharCode(elem^key[idx%10].charcodeAt(0).toString(10))).join('')
At this point we know that the long array is being XOR-ed with a repetitive 10 letters key, and the result has to be the actual image since a URL can’t be that long. Since we already know the length of the key, we can try to break it (If we didn’t, we’d have to find it first!). The steps to break repetitive XOR are as follows:
- Split the ciphertext into blocks of KEYSIZE length.
- Transpose the blocks: make a new block with the first byte of every block, then a new block with the second byte of every block, and so on.
- Solve each block as if it was single-character XOR.
- To break XOR, a simple scoring method based on characters frequency will do.
I’ve put together a short Python script that guesses the most probably five key sizes (notice that 10 is in there as well!) then goes on to crack each of the ten transposed blocks individually:
~ python breakXOR.py
[+] Most possible 5 key sizes:
[*] Key size: 2 Hamming dist: 2.6
[*] Key size: 4 Hamming dist: 2.95
[*] Key size: 3 Hamming dist: 3.06666666667
[*] Key size: 20 Hamming dist: 3.08
[*] Key size: 10 Hamming dist: 3.14
[+] Possible keys for transposed block 0. keysize: 10
83 score: 0.805912157728
[+] Possible keys for transposed block 1. keysize: 10
101 score: 0.799952744743
[...]
Key: SeCTaLks<
Message: DaTA:ImagEpNG;Base,IvBoRw0kggOaAaANSuHEuGAaAdUaaAkC[...]
Notice that the result looks very very promising but currently there are a few issues:
- The last character of the key is not a printable ASCII.
- The decrypted result includes some uppercase/lowercase letters mismatches.
Intuitively, we can see these errors are related to the case of the letters in the password. If we XOR a letter with a blank space (0x20) we get its case reversed. Since we know the password should be 10 characters long, and the first 10 characters of the result are DaTA:ImagE we can easily get the actual key by substracting 0x20 from the password characters corresponding to the wrong case letters in the decrypted text. For example:
- The first character of the result should be ‘d’ instead of ‘D’. We add 0x20 to the first charcter of the key and we get ‘s’
- The last character of the text should be ‘e’ instead of ‘E’. We add 0x20 to the last character of the key (0x13) and we get ‘3’ (0x33)
So the key to the first stage is sectalks<3 ![]()
Stage 1
Armed with the password from the previous stage, let’s check what’s with the image
v = [23, 4, 23, 21, 9, .....]
key = "sectalks<3"

dec = "".join([chr(v[i] ^ ord(key[i % 10])) for i in range(len(v))])
f = open("3.out", "wb")
f.write(dec)
f.close()
As expected, the image is a PNG file, base64 encoded:
data:image/png;base64,iVBORw.....
Another starting point to solve this challenge could have been to know the format expected by the src html tag, namely data:image/... The password could have been obtained by XOR-ing the first 10 character of this header with the first 10 elements of the array. Anyways, let’s move on and decode the base64:
~ cat image.b64 | base64 -d   > image.png
~ feh image.png
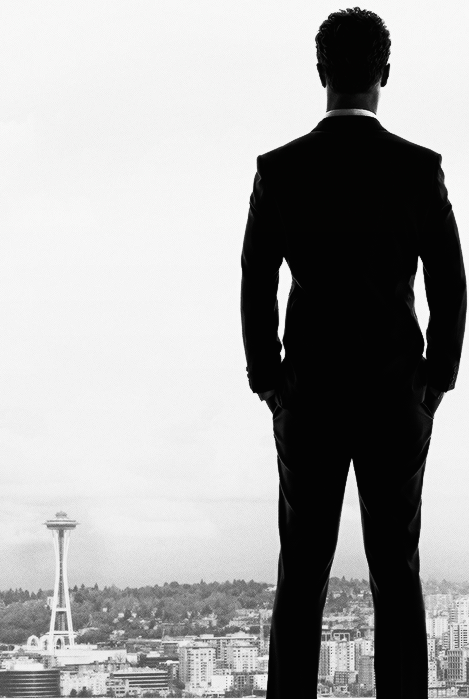
The clue for this stage is ‘in the movie name’. First you might ask, what movie?? If you’re not a fan of the genre, just upload the image on the Google reverse image search page and you’ll get the movie name:

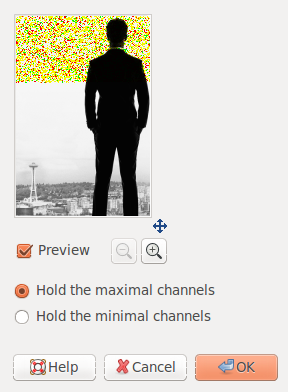
Now there is a lot of grey/gray in the picture. I first fired up Gimp to see if I can spot anything suspicious in there. First thing I noticed is that the alpha channel is blank. No luck here. Then I started to fiddle with colour filters to see if I can spot the place where something has been injected. The Colour Enhance filter (Colours -> Auto -> Colour Enhance) reveals an area which has clearly been manually altered:

Same effect can be seen also with the Maximum RGB filter. This keeps the intensity of the RGB color channel which has the maximal/minimal intensity and reduces other both to zero. This observation will prove useful later in figuring out the steganography scheme.
After many tries to guess the obfuscation scheme, I realised that there is a repetitive pattern in all the modified pixels in the upper part of the image. Take a moment to look at the pixel values below and try to find out yourself what the pattern is. The colours below represent the RGBA codes:
(246, 245, 245, 255)
(248, 249, 248, 255)
(247, 246, 246, 255)
(248, 247, 247, 255)
(244, 245, 244, 255)
(249, 248, 248, 255)
(247, 246, 246, 255)
(247, 248, 247, 255)
(248, 247, 247, 255)
(246, 247, 246, 255)
As you have probably spotted, we have two cases:
- R and G == B
- R == B and G
So each pixel in the marked area encodes a single bit. It’s actually very easy to code this in Python, using the Python Imaging Library. This script checks the above condition in all the pixels and adds a 0 or 1 to a stream of bits. It then splits the stream into bytes and dumps them:
 ~ python breakStego.py image.png out
[+] Width: 469 Heigh: 699 (pixels)
699 469
~ less out
[][(![]+[])[+[]]+([![]]+[][[]]) ....
Stage 2
The easy solution for this is to recognise that the output extracted from the image is obfuscated JavaScript. We can just paste it into the Web Developer console and see what it does:

That JavaScript looks pretty cool. Let’s spend some time to understand the obfuscation technique. A quick Google search for “obfuscated javascript using tons of square brackets” leads us to JSFuck:
JSFuck is an esoteric and educational programming style based on the atomic parts of JavaScript. It uses only six different characters to write and execute code.
If you’re curious how everything can be constructed from just 6 characters, check its source code, it’s very clever. The tool was developed by Martin Kleppe and his website has some amazing work, make sure you check it out.