![]()
Context
While going through some old folders I found source code and other files related to a previous incident involving a hardware keylogger (I’ll use the term HKL for the rest of the post since the model of the device is not relevant here) for which I was doing the forensic analysis. Since I have some spare time and because I was suspecting a few possible issues with the HKL, I decided now it’s the time to dig a bit deeper.
The device was found by a customer on his premises and retrieved for analysis, pressumably after a few days of being planted. Hardware keyloggers are used to record computer user’s keystrokes. This often includes sensitive information, like passwords and confidential emails. The device is mounted inline between the keyboard and the PC and records everything without any advance pre-configuration, making it ideal for a non-technical attacker.
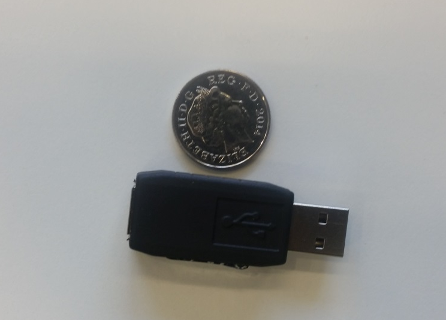
And if you’re curious what’s under the bonnet:
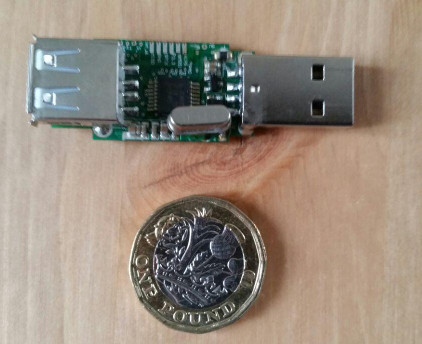
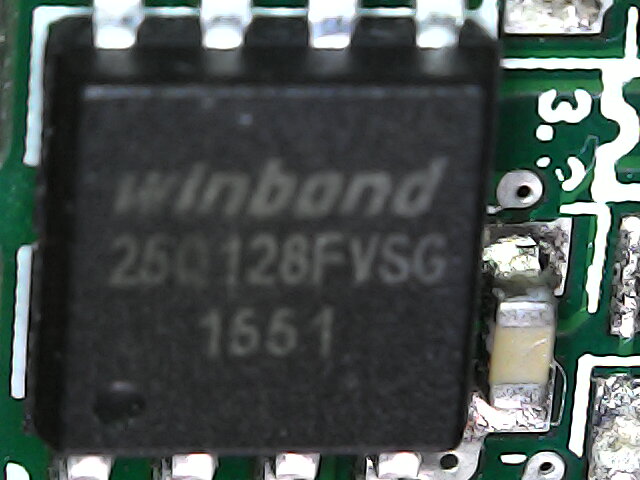
Let’s go a bit deeper and use a microscope to see what chips we have on the board. Click on the items below to enlarge the images. An NXP HC4015 chip:

Next we have a Winbod 25Q128FV serial flash memory:
An Atmel ARM microcontroller - AT91SAM7S64:

And an HC4066 (analog switch?):

Findings
How it works
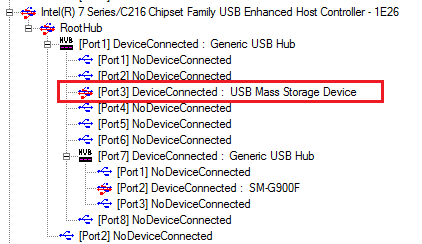
The way this keylogger works is quite clever. It stays inline between the keyboard and the computer and is completely invisible to the operating system until a correct 3-key combination is entered. So it works seamlessly with any OS and keyboard. The first screenshot below shows the USB devices before inserting the keylogger, on a Windows box:
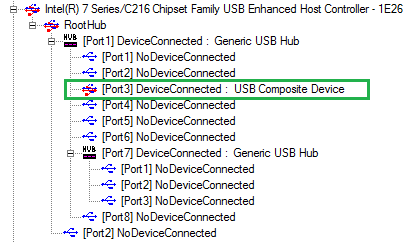
That doesn’t change at all after we insert the keylogger! There’s no new USB device. But aftter we enter the correct three letter combination (read below how to recover this password) we seea new mass storage device:
The LOG.TXT file on the root of the newly revealed partition contains the logged keystrokes for all the session captured by the device. The sessions are separrated by a [PWR] entry. Special keys are logged as well. The image below shows the user entering his login credentials after Ctrl-Alt-Del:

Funny enough, in this case in the LOG.TXT file there was even a session recorded most probably on the attacker’s machine while he was testing the device. Nothing to incriminate him/her though.
Brute force the password
Before starting, let’s mention that the HKL has a default 3-key combination password, the same for all devices out of the factory. It can be configured later very easily, and the steps are clearly described in its manual, but some people don’t bother. More importantly, it also has a 3-key combination kill switch, which is meant to prevent brute-force attacks. If you try to brute-force the password and hit the unlucky numbers, the device will erase itself, or so it should. This is not specified in the manual and it’s supposed to be secret. Also it is not configurable but, as i found out later, it is the same for all devices.
To find the 3-key combination password, our idea was to use a Teensy USB development board in order to simulate all the keystroke combinations. I went for this Teensy 3.1. Getting started with Ubuntu and Arduino went smoothly, following the official guides. If you’re anxious to see the code:
/* USB Keyboard brute forcer for key loggers that require a 3 letter combination
    in sequence to mount the hidden files
*/

// Subroutine addresses for a safe restart of the teensy 3.1
#define RESTART_ADDR       0xE000ED0C
#define READ_RESTART()     (*(volatile uint32_t *)RESTART_ADDR)
#define WRITE_RESTART(val) ((*(volatile uint32_t *)RESTART_ADDR) = (val))

// Led pin number
const int ledPin = 13;   // Teensy 2.0 = Pin 11, Teensy++ 2.0 = Pin 6

// Char array
int const key_codes_alpha[] = { KEY_Q, KEY_W, KEY_E, KEY_R, KEY_T, KEY_Y, KEY_U,
	      KEY_I, KEY_O, KEY_P, KEY_A, KEY_S, KEY_D, KEY_F, KEY_G, KEY_H, KEY_J,
	      KEY_K, KEY_L, KEY_Z, KEY_X, KEY_C, KEY_V, KEY_B, KEY_M, KEY_N, KEY_1};

int x, y, z;

void loop() {
  digitalWrite(ledPin, HIGH);

  Keyboard.set_key1(0);
  Keyboard.set_key2(0);
  Keyboard.set_key3(0);
  Keyboard.send_now();

  x = y = z = 0;

  for (int x = 0; x<27; x++)
  {
    Keyboard.set_key1(key_codes_alpha[x]);
    Keyboard.send_now();
    delay(10);

    for (int y = x+1; y<27; y++)
    {
      Keyboard.set_key2(key_codes_alpha[y]);
      Keyboard.send_now();
      delay(10);

      for (int z = y+1; z<27; z++)
      {
        if ( (x == 9 ) && (y == 11) && (z == 25) ) continue;
        Keyboard.set_key3(key_codes_alpha[z]);
        Keyboard.send_now();
        delay(10);
      }
    }
  }

  delay(5000);

  digitalWrite(ledPin, LOW);

  WRITE_RESTART(0x5FA0004);
}
So using the code above we found the combination which, no surprise here, was the default one:

Next step I did was to take a bit-by-bit image of the 16MB USB partition and see what else was there, besides LOG.TXT. My guess was that maybe the guys behind this used the device before and I might find more intereseting logs within the slack space or unallocated bytes. Using Autopsy and The Sleuth Kit, quickly some more files were revealed.
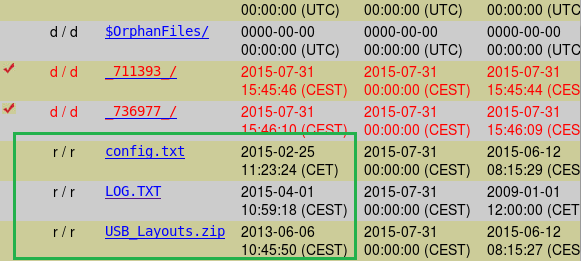
A few deleted files and one very interesting config.txt:
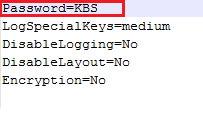
Finding the kill-switch
Because I didn’t want to accidentally trigger the kill switch and erase valueable evidence, I bought a second HKL, same model, and ran the brute-force script on that one. It was obvious when I’ve stumbled upon the kill switch during the password guessing process process because the LOG.TXT file had only the keystrokes which were sent after it, and the ones sent before were deleted. So far it seemed to be working fine.
So what if I would had accidentaly ‘pressed’ the kill-switch combo during the brute-force attack? Would that erase everything? Not necessarily! To test this hypothesis, I’ve done the following steps:
- Mount the HKL using the default password.
- Create a large (~20Kb) LOG.TXT file and 3 more additional files on the drive.
python -c 'print "the lazy dog\n"*20000' > /media/me/KEYGRABBER/LOG.TXT
- Trigger the erase process using the default kill switch combo discovered before.
- Type some more stuff, then enter the unlock password
- Take a full image of the disk.
- Examine everything, including unallocated space and slack.
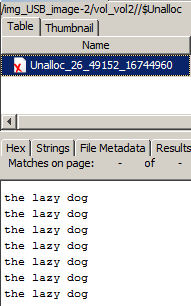
When performing the autopsy of the drive, the LOG.TXT was there, sure enough, but everything before the kill switch had been deleted:
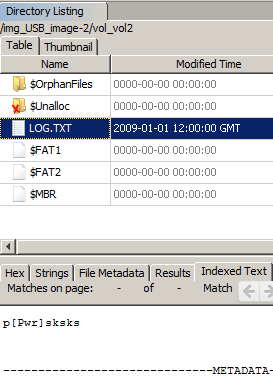
But more interestingly, the unallocated space contained exactly the content of LOG.TXT file before supposedly being erased:
Conclusion
This was a very fun and interesting project for me. I’ve learnt to work with the Teensy board and Arduino and managed to find the data that was about to be exfiltrated. I wish I were able to recover the actual code of the HKL as well, but this is another story.
A few vulnerabilities have been discovered along the way. Luckily, there was no moral disputes here about responsible dislosure:
Summary of vulns:
- Vuln #1 - Default 3-key combo password, same on all devices
- Vuln #3 - Security by obscurity - secret kill switch combo
- Vuln #2 - Default and unchangeable 3-key combo kill switch on all devices
- Vuln #4 - Logs are not erased securely

Miscellaneous technical bits
Use USB HID devices in a virtual machine in VMWare
- Select the virtual machine and go to VM > Settings.
- On the Hardware tab, select USB Controller.hkl
- Select Show all USB input devices. This option will enable the usage of USB HIDs inside the virtual machine.
- Click OK to save your changes and power on the VM.
Create an image of a USB drive
- Check first that it is indeed the right device you want to image:
$ sudo fdisk -l /dev/sdc - Do a bit-by-bit copy using dd:
$ sudo dd if=/dev/sdc of=./USB_image status=progress