![]()
Motivation
I’m always very interested in finding out how things work on a lower level and since I had a few spare days I’ve decided to play around with some sensors and an Arduino board I’ve been using for random projects. After all, there are many mechatronics tutorials online, so how hard can it be?
It turned out that a lot of tutorials implicitely assume many prerequisites. Also they didn’t match exactly the electronic pieces I had already ordered (and waited for almost a month to be shipped from overseas!). But overall it was a good learning experience. So in this post I’ll go through all the steps and include fixes for some issues I’ve encountered along the way. Hopefully this will be useful for somebody in a same position as I was a few days ago. Let’s begin!
Hardware components
I’ve experimented with a bunch of different components and in the end stuck with the ones below (click on the images below to expand). I got most of them from DealExtreme but you can probably find them in many other online shops.
- Arduino Uno R3 Rev3 ATMEGA328P Board:

- SYB-120 Breadboard with Jump Wires:

- DHT22 2302 Digital Temperature and Humidity Sensor Module:

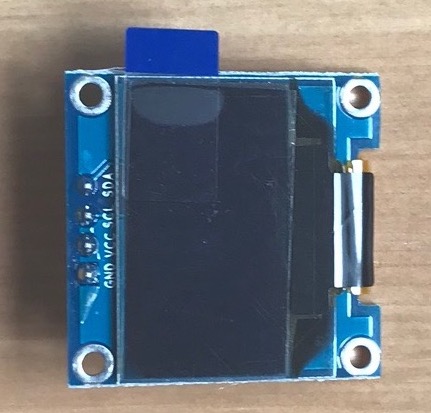
- 0.96 128x64 I2C Blue Color OLED Display Module:

Issue #1 - Cables
My work machine is an Ubuntu 16.04 box. After having no luck to automatically detect the Arduino board, I found the following solution: unplug the arduino, unload the cdc_acm module and reload it.
$ sudo rmmod cdc_acm
$ sudo modprobe cdc_acm
Still not detected. Then I realised the problem was much simpler. The USB printer cable that came with the board was faulty. Not a very common thing but something to be aware of.
After replacing the cable, the board was detected on ttyUSB0 (ch341-uart is the Serial-to-USB converter on the board):
$ dmesg
[23461.758957] usb 1-1.1: new full-speed USB device number 24 using ehci-pci
[23461.852789] usb 1-1.1: New USB device found, idVendor=1a86, idProduct=7523
[23461.852799] usb 1-1.1: New USB device strings: Mfr=0, Product=2, SerialNumber=0
[23461.852804] usb 1-1.1: Product: USB2.0-Serial
[23461.854322] ch341 1-1.1:1.0: ch341-uart converter detected
[23461.858347] usb 1-1.1: ch341-uart converter now attached to ttyUSB0
Issue #2 - Breadboard
Something I didn’t notice from the start which was confusing is that the SYB-120 Breadboard has two gaps in each distribution strip: the distribution strips are split into three pieces, instead of running along the board from one end to another, as you would expect from other boards. You can easily notice this if you remove the back cover of the board:

Software
I’ve used the following software and libraries:
- Arduino IDE. Very easy to set up on Ubuntu. Read the whole guide, especially the section named Please Read :)
- cactus.io DHT22 Library. To install a new library from a ZIP file in Arduino IDE, navigate to Sketch → Include Library → Add .ZIP Library.
- SSD1306 Driver Library
- GFX Library
Issue #3 - Arduino IDE upload error
When trying to upload the compiled hex file to the board I got the following pemission error:
avrdude: ser_open(): can't open device "/dev/ttyACM0": Permission denied
ioctl("TIOCMGET"): Inappropriate ioctl for device
If you read the whole guide above, the fix is already discussed there:
$ sudo usermod -a -G dialout `whoami`
$ sudo chmod a+rw /dev/ttyACM0
Wiring
Humidity/Temperature sensor
To connect and play with the humidity/tempratature sensor, I’ve found an awesome blog that explained everything:
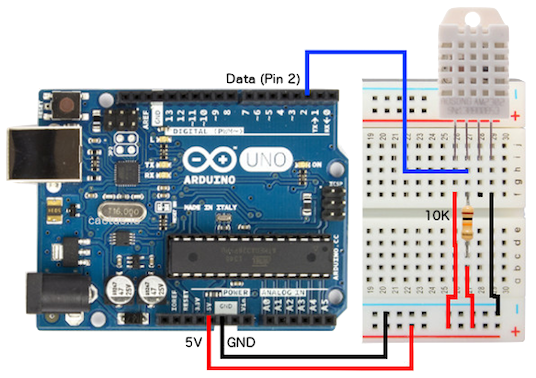
Two things were different in my setup:
- First, my sensor came out mounted on a breakout board, so it didn’t require the 10K pull up resistor.
- The pins for my mounted sensor were different than the ones in the image above. The mapping is as follows: + → VCC, - → GND, OUT → DATA.
I2C OLED Display
I’ve found the instructions to hook the OLED display here. The PIN from the OLED maps to the Arduino Uno as follows:
- OLED GND – Arduino GND
- OLED VCC – Arduino 5V
- OLED SCL – Arduino Uno A5
- OLED SDA – Arduino Uno A4
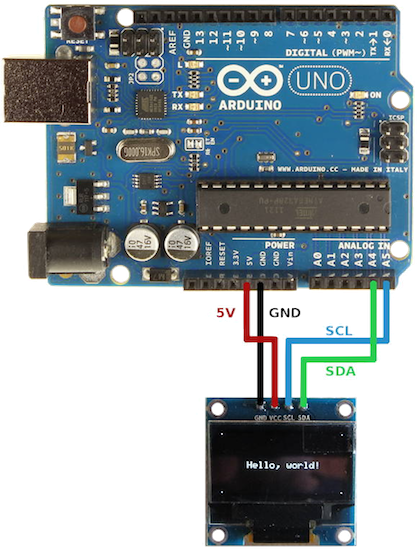
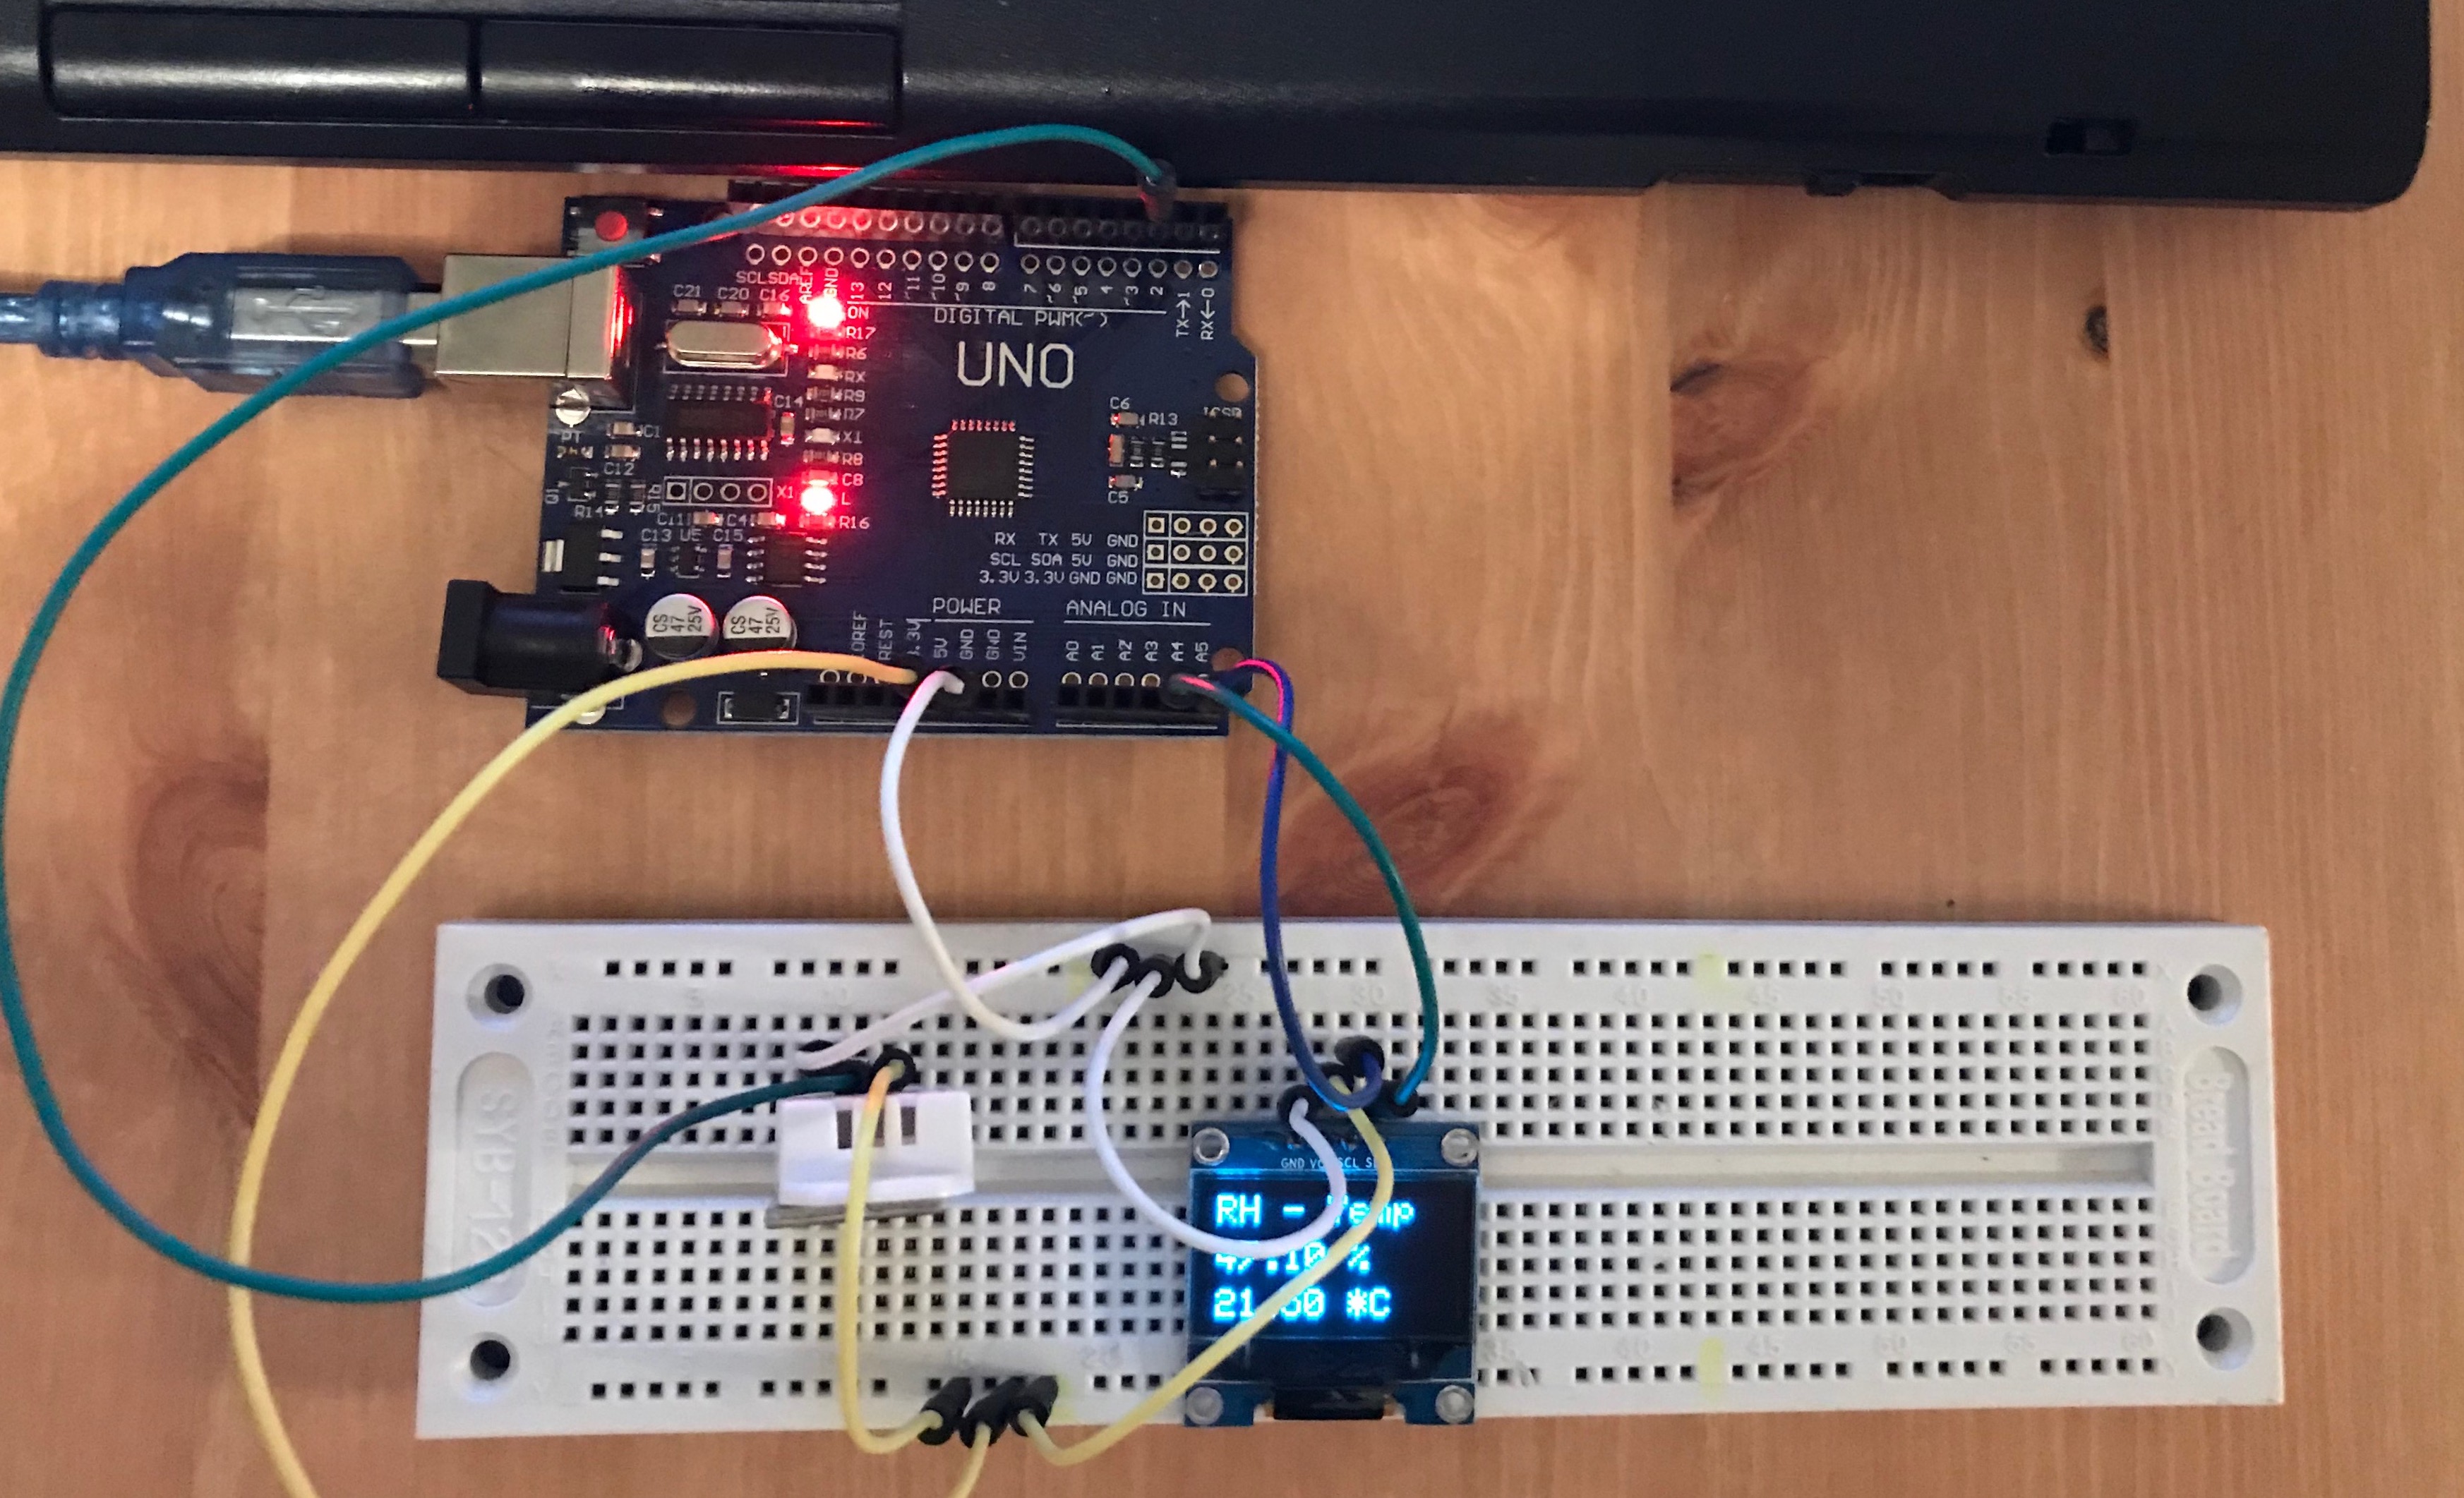
If you’re going through the article, one important section is Modifying the SSD1306 Driver. Don’t skip it! After connecting everything, my board looks like this (all connections are visible, click to expand):
Coding
Finally, let’s do some coding. After putting the board together, I’ve tested separately the OLED and the DHT22 sensor. All good. The ssd1306_128x64_i2c sketch example (File → Examples → Adafruit SSD1306) demoes all the functionality of the GFX library and is a good starting point for working with the OLED.
Issues #4 - Generate a custom PROGMEM bitmap
The example from the Adafruit GFX Graphics Library draws the Adafruit logo using a 16x16 bitmap. I wanted to replace the logo with something else. Although this can be done manually as well, this site converts an image into a PROGMEM bitmap and has a lot of options as well.
The final code:
#include <cactus_io_DHT22.h>

// what pin on the arduino is the DHT22 data line connected to
#define DHT22_PIN 2

// Initialize DHT sensor for normal 16mhz Arduino.
DHT22 dht(DHT22_PIN);

#include <SPI.h>
#include <Wire.h>
#include <Adafruit_GFX.h>
#include <Adafruit_SSD1306.h>

#define OLED_RESET 4
Adafruit_SSD1306 display(OLED_RESET);

// 64x64px Apple logo
const unsigned char PROGMEM logo[]  = {
  0xff, 0xff, 0xff, 0xff, 0xff, 0xff, 0xff, 0xff, 0xff, 0xff, 0xff, 0xff, 0xff, 0xff, 0xff, 0xff,
  0xff, 0xff, 0xff, 0xff, 0xff, 0x87, 0xff, 0xff, 0xff, 0xff, 0xff, 0xff, 0xfe, 0x07, 0xff, 0xff,
  0xff, 0xff, 0xff, 0xff, 0xf8, 0x07, 0xff, 0xff, 0xff, 0xff, 0xff, 0xff, 0xf0, 0x0f, 0xff, 0xff,
  0xff, 0xff, 0xff, 0xff, 0xe0, 0x0f, 0xff, 0xff, 0xff, 0xff, 0xff, 0xff, 0xc0, 0x0f, 0xff, 0xff,
  0xff, 0xff, 0xff, 0xff, 0xc0, 0x1f, 0xff, 0xff, 0xff, 0xff, 0xff, 0xff, 0x80, 0x1f, 0xff, 0xff,
  0xff, 0xff, 0xff, 0xff, 0x80, 0x3f, 0xff, 0xff, 0xff, 0xff, 0xff, 0xff, 0x00, 0x7f, 0xff, 0xff,
  0xff, 0xff, 0xff, 0xff, 0x00, 0xff, 0xff, 0xff, 0xff, 0xff, 0xff, 0xff, 0x01, 0xff, 0xff, 0xff,
  0xff, 0xff, 0xff, 0xff, 0x03, 0xff, 0xff, 0xff, 0xff, 0xff, 0xff, 0xff, 0x1f, 0xff, 0xff, 0xff,
  0xff, 0xff, 0xe0, 0x7f, 0xff, 0x00, 0xff, 0xff, 0xff, 0xff, 0x00, 0x0f, 0xf8, 0x00, 0x1f, 0xff,
  0xff, 0xfc, 0x00, 0x01, 0xc0, 0x00, 0x0f, 0xff, 0xff, 0xf8, 0x00, 0x00, 0x00, 0x00, 0x03, 0xff,
  0xff, 0xf0, 0x00, 0x00, 0x00, 0x00, 0x01, 0xff, 0xff, 0xe0, 0x00, 0x00, 0x00, 0x00, 0x00, 0xff,
  0xff, 0xc0, 0x00, 0x00, 0x00, 0x00, 0x01, 0xff, 0xff, 0x80, 0x00, 0x00, 0x00, 0x00, 0x03, 0xff,
  0xff, 0x80, 0x00, 0x00, 0x00, 0x00, 0x07, 0xff, 0xff, 0x00, 0x00, 0x00, 0x00, 0x00, 0x0f, 0xff,
  0xff, 0x00, 0x00, 0x00, 0x00, 0x00, 0x1f, 0xff, 0xfe, 0x00, 0x00, 0x00, 0x00, 0x00, 0x1f, 0xff,
  0xfe, 0x00, 0x00, 0x00, 0x00, 0x00, 0x3f, 0xff, 0xfe, 0x00, 0x00, 0x00, 0x00, 0x00, 0x3f, 0xff,
  0xfe, 0x00, 0x00, 0x00, 0x00, 0x00, 0x3f, 0xff, 0xfe, 0x00, 0x00, 0x00, 0x00, 0x00, 0x7f, 0xff,
  0xfc, 0x00, 0x00, 0x00, 0x00, 0x00, 0x7f, 0xff, 0xfc, 0x00, 0x00, 0x00, 0x00, 0x00, 0x7f, 0xff,
  0xfc, 0x00, 0x00, 0x00, 0x00, 0x00, 0x7f, 0xff, 0xfc, 0x00, 0x00, 0x00, 0x00, 0x00, 0x7f, 0xff,
  0xfc, 0x00, 0x00, 0x00, 0x00, 0x00, 0x3f, 0xff, 0xfe, 0x00, 0x00, 0x00, 0x00, 0x00, 0x3f, 0xff,
  0xfe, 0x00, 0x00, 0x00, 0x00, 0x00, 0x3f, 0xff, 0xfe, 0x00, 0x00, 0x00, 0x00, 0x00, 0x3f, 0xff,
  0xfe, 0x00, 0x00, 0x00, 0x00, 0x00, 0x1f, 0xff, 0xfe, 0x00, 0x00, 0x00, 0x00, 0x00, 0x0f, 0xff,
  0xfe, 0x00, 0x00, 0x00, 0x00, 0x00, 0x07, 0xff, 0xff, 0x00, 0x00, 0x00, 0x00, 0x00, 0x03, 0xff,
  0xff, 0x00, 0x00, 0x00, 0x00, 0x00, 0x01, 0xff, 0xff, 0x00, 0x00, 0x00, 0x00, 0x00, 0x00, 0xff,
  0xff, 0x80, 0x00, 0x00, 0x00, 0x00, 0x00, 0x3f, 0xff, 0x80, 0x00, 0x00, 0x00, 0x00, 0x00, 0x7f,
  0xff, 0x80, 0x00, 0x00, 0x00, 0x00, 0x00, 0x7f, 0xff, 0xc0, 0x00, 0x00, 0x00, 0x00, 0x00, 0xff,
  0xff, 0xc0, 0x00, 0x00, 0x00, 0x00, 0x00, 0xff, 0xff, 0xe0, 0x00, 0x00, 0x00, 0x00, 0x01, 0xff,
  0xff, 0xe0, 0x00, 0x00, 0x00, 0x00, 0x01, 0xff, 0xff, 0xf0, 0x00, 0x00, 0x00, 0x00, 0x03, 0xff,
  0xff, 0xf8, 0x00, 0x00, 0x00, 0x00, 0x03, 0xff, 0xff, 0xfc, 0x00, 0x00, 0x00, 0x00, 0x07, 0xff,
  0xff, 0xfc, 0x00, 0x00, 0x00, 0x00, 0x0f, 0xff, 0xff, 0xfe, 0x00, 0x00, 0x00, 0x00, 0x1f, 0xff,
  0xff, 0xff, 0x00, 0x00, 0x00, 0x00, 0x1f, 0xff, 0xff, 0xff, 0x80, 0x00, 0x00, 0x00, 0x3f, 0xff,
  0xff, 0xff, 0xc0, 0x03, 0xf0, 0x00, 0x7f, 0xff, 0xff, 0xff, 0xe0, 0x1f, 0xfe, 0x01, 0xff, 0xff,
  0xff, 0xff, 0xff, 0xff, 0xff, 0xff, 0xff, 0xff, 0xff, 0xff, 0xff, 0xff, 0xff, 0xff, 0xff, 0xff,
};

#if (SSD1306_LCDHEIGHT != 64)
#error("Height incorrect, please fix Adafruit_SSD1306.h!");
#endif

void setup()   {
  // Initialise serial (print stats and debug info)
  Serial.begin(9600);

  // Initialise DHT library
  dht.begin();

  // initialize with the I2C addr 0x3C (Hint: Use I2C Scanner)
  display.begin(SSD1306_SWITCHCAPVCC, 0x3C);

  // Clear the buffer containing defualt Ada splashscreen
  display.clearDisplay();

  // Display logo
  display.drawBitmap(30, 0,  logo, 64, 64, 1);
  display.display();
  delay(3000);
}


void loop() {
  static char buf[15];

  // Reading temperature or humidity takes about 250 milliseconds!
  // Sensor readings may also be up to 2 seconds 'old' (its a very slow sensor)
  dht.readHumidity();
  dht.readTemperature();

  // Check if any reads failed and exit early (to try again).
  if (isnan(dht.humidity) || isnan(dht.temperature_C)) {
    Serial.println("DHT sensor read failure!");
    return;
  }

  Serial.print(dht.humidity); Serial.print(" %\t\t");
  Serial.print(dht.temperature_C); Serial.print(" *C\n");

  // Print relative humidity and temperature
  display.setTextSize(2);
  display.setTextColor(WHITE);
  display.setCursor(0,0);
  display.clearDisplay();
  display.println("RH - Temp");

  display.setCursor(0,25);
  dtostrf(dht.humidity,5, 2, buf);
  display.print(buf);
  display.println(" %");

  display.setCursor(0, 50);
  dtostrf(dht.temperature_C,5, 2, buf);
  display.print(buf);
  display.println(" *C");

  // Actually print stuff!
  display.display();

  // Wait a few seconds between measurements. The DHT22 should not be read at a higher frequency of
  // about once every 2 seconds. So we add a 3 second delay to cover this.
  delay(3000);
}