Context
First I would like to give credit to the author of the picture I’ve used above, taken from pxleyes. It’s awesome, thank you! ![]()
After reading Game Hacking: WinXP Minesweeper I realised I wanted to do something similar but on a Linux system. This would be a great opportunity for me to learn some new skills, like debuging stripped GTK applications or becoming a GDB ninja (not!) while doing something interesting all along and with potential applications outside the gaming area.
My goal in this post is to reverse engineer the GNOME Minesweeper game and locate relevant areas in memory to patch. As a bonus, the result has to be as visually pleasing as possible! No pre-requisites are strictly necessary to follow along, but basic reversing knowledge and familiarity with GDB is always nice to have! Most important of course is a desire to learn. So let’s begin.
Debugging GTK applications
To perform debugging and inspection of GTK applications, we have two quite stable options: GTKInspector and gtkparasite (on which the GTKInspector is also based). I opted for the Parasite, which seems to be more established and has interesting features, like the ability to interact with GTK widgets from a Python shell, and apply CSS styles globally or individually per objects. A few things are needed to quickly get it working:
- Download and install:
$ git clone git://github.com/chipx86/gtkparasite
$ cd gtkparasite
$ ./autogen.sh --with-gtk=3.0
$ make
$ sudo make install
- Set the
GTK_modulesenvironment variable:
export GTK_MODULES=gtkparasite:$GTK_MODULES
- Make sure the application to be debugged is built using GTK3, because gtkparasite dropped support for GTK2. Check out which version of GTK
gnome-mineswas built against:
$ ldd `which gnome-mines` | grep gtk
    libgtk-3.so.0 => /usr/lib/x86_64-linux-gnu/libgtk-3.so.0 (0x00007f2dc7f18000)
- If you still get an error when trying to lunch GTK apps, make sure the libraries are placed in the correct location. The following workaround applies for Ubuntu 16.04:
$ gnome-calculator
Gtk-Message: Failed to load module "gtkparasite"
$ find / -name  "libgtkparasite*.so" 2>/dev/null
/home/liv/Downloads/gtkparasite/src/.libs/libgtkparasite.so
/usr/lib/x86_64-linux-gnu/gtk-3.0/modules/libgtkparasite.so
/usr/local/lib/gtk-3.0/modules/libgtkparasite.so
$ sudo cp /usr/local/lib/gtk-3.0/modules/libgtkparasite.so /usr/lib/x86_64-linux-gnu/gtk-3.0/modules
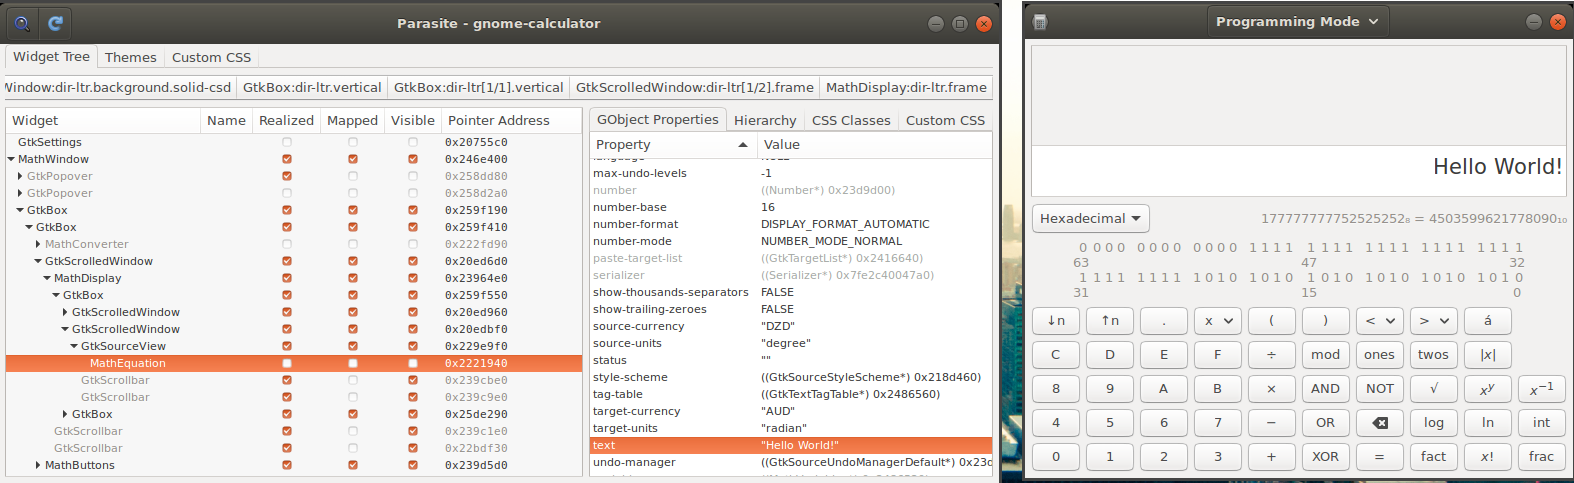
Now that gtkparasire is up and running, let’s make sure we can perform some basic inspection of GUI widgets:
- If everything worked fine, when launching the calculator (
gnome-calc) you should also see also the gtk-parasite window. - Use the magnifying glass to select the text box.
- In the right pane with the object’s properties, double-click on the buffer’s value.
- Then navigate to the properties of
textfield and change it to whatever you like. Voila!
Static analysis
To be able to mess with objects in memory, we need to understand the internals of Minesweeper first. Luckily, the source code is available online. The goal for this section is to perform simple identification of data structures in memory, like obtaining the number of mines and details of the board (width, height) for example.
- From gtkparasite we can see that the mine field is stored in a **MinefieldView_ class. This will be the starting point. In the source code (minefield.vala) we see however that all the interesting fields are stored in a **_minefield class:
public class Minefield : Object
{
    /* Size of map */
    public uint width = 0;
    public uint height = 0;

    /* Number of mines in map */
    public uint n_mines = 0;

    /* State of each location */
    protected Location[,] locations;
    [...]
- After a bit of poking around with IDA Pro, we find the link between the MineFieldView object and the minefield class.
__int64 __fastcall get_minefield(__int64 MFView)
{
  __int64 result; // rax@2

  if ( MFView )
    result = *(_QWORD *)(*(_QWORD *)(MFView + 0x30) + 0x28LL);
  else
    result = ERR_minefield_view_get_minefield();
  return result;
}
- This means that to obtain a pointer to the most important structure - minefield, we can perform the following steps in GDB using convenience variables:
gdb$ set $minefieldview = 0x816dd0
gdb$ set $minefield = *($minefieldview+0x30)+0x28
- Going further, let’s locate where exactly in the minefield structure we have the width, height and n_mines fields. for the sake of brevity I won’t list all the steps to locate those fields, however, the minefield class looks like this after identifyng the key fields:
00000000 minefield_class struc ; (sizeof=0x44, mappedto_9)
00000000 field_0         dd ?
00000004 field_4         dd ?
00000008 field_8         dd ?
0000000C field_C         dd ?
00000010 field_10        dd ?
00000014 field_14        dd ?
00000018 _n_cleared      dd ?
0000001C _n_flags        dd ?
00000020 width           dd ?
00000024 height          dd ?
00000028 n_mines         dd ?
0000002C field_2C        dd ?
00000030 locations       dd ?
00000034 field_34        dd ?
00000038 _paused         dd ?
0000003C field_3C        dd ?
00000040 exploded        dd ?
- Back in GDB, for an 8x8 table with 10 mines, we have:
set $width=*(*$minefield+0x20)
set $height=*(*$minefield+0x24)
set $n_mines=*(*$minefield+0x28)
gdb$ print $width
$1 = 0x8
gdb$ print $height
$2 = 0x8
gdb$ print $n_mines
$3 = 0xa
GDB Kung-Fu
- Using similar logic as before, we can map all the needed information related to the position of the mines. The has_mine function queries the locations array:
public bool has_mine (uint x, uint y)
{
    return locations[x, y].has_mine
}
- Back to IDA Pro, the disassembly of the function shows the offset shows the offsets inside the minefield class:
__int64 __fastcall has_mine(minefield_class *minefield, int x, int y)
{
  if ( minefield )
    return *(unsigned int *)(*(_QWORD *)(*(_QWORD *)&minefield->locations
                                       + 8LL * (unsigned int)(minefield->field_3C * x + y))
                           + 0x20LL);
  g_return_if_fail_warning(0LL, "minefield_has_mine", "self != NULL");
  return 0LL;
}
- Using the information from above, we can construct a query in GDB to verify whether the location at [x,y] has a mine or not:
set $x=1
set $y=1
set $has_mine_xy = *(*(*(*$minefield+0x30) +8*(*(*$minefield+0x3c)*$x+$y))+0x20)
print $has_mine_xy
$20 = 0x0
- Below is the full GDB script that can be used to reveal all the mines. While debugging, stope the execution (Ctrl+C) and define the following function:
define discover_minefield
    #
    # Initialise MiefieldView with the value from gtkparasite
    # Usage: discover_minefield 0x816dd0
    #
    set $minefieldview=$arg0
    # Reconnaissance
    set $minefield=*($minefieldview+0x30)+0x28
    set $width=*(*$minefield+0x20)
    printf "Minefield width: %d\n", $width
    set $height=*(*$minefield+0x24)
    printf "Minefield height: %d\n", $height
    set $n_mines=*(*$minefield+0x28)
    printf "Number of mines: %d\n", $n_mines
    set $x=0
    set $y=0
    set $mf = (char*)malloc(100)
    set $saved_mf = $mf
    set $mine = "X"
    set $clear = "-"
    set $mines_discovered = 0

    # Style for discovered mines
    set $gtk_style = (char*)malloc(2048)
    set $saved_gtk_style = $gtk_style
    set $child_num = 1
    set $buf = (char*)malloc(64)

    # Go from left to right, line by line, so we can build the matrix string
    while $y<$height
        # Convert address to (QWORD*)
        set $has_mine_xy = *(long*)(*(*$minefield+0x30) +8*(*(*$minefield+0x3c)*$x+$y))+0x20
        #print $has_mine_xy
        if *$has_mine_xy==1
            #printf "[%d,%d] %s\n", $x, $y, $mine
            # Saved the result of the function to avoid printing
            set $unused = strncpy($mf++, $mine, 1)

            # Transpose the child number
            set $x_child = $child_num % $width
            set $y_child = $child_num / $width + 1
            if $x_child ==0
                set $x_child = $width
                set $y_child = $y_child - 1
            end

            set $child_num_trans = $height * ($x_child-1) + $y_child
            set $unused = sprintf($buf, ".tile:nth-child(%3d){ background: pink; }\n", $child_num_trans)
            set $unused = strcpy($gtk_style, $buf)
            set $gtk_style = $gtk_style + strlen($buf)
            set $mines_discovered = $mines_discovered + 1
        else
            #printf "[%d,%d] %s\n", $x, $y, $clear
            set $unused = strncpy($mf++, $clear, 1)
        end

        set $child_num = $child_num + 1
        set $x=$x+1
        if $x==$width
            set $x=0
            set $y=$y+1
            set $unused = strncpy($mf++, "\n", 1)
        end
    end

    set $unused = strncpy($mf, "\0", 1)
    printf "Mines discovered: %d/%d\n", $mines_discovered, $n_mines
    printf "%s\n\n", $saved_mf

    # Log css to file
    set logging on
    set logging file gtk.css
    set logging redirect on             # Log only to file not stdout
    printf "%s\n", $saved_gtk_style
    set logging off
    printf "CSS style saved to gtk.css. Apply the style to view mines.\n"
end
- The first parameter to the function is the pointer to the MineFieldView object, obtained from gtkparasite window:
gdb$ discover_minefield 0x816dd0
Minefield width: 8
Minefield height: 8
Number of mines: 10
Mines discovered: 10/10
X---X---
X---X---
--------
X-------
-X-X---X
---X----
--------
----X---
CSS style saved to gtk.css. Apply the style to view mines.
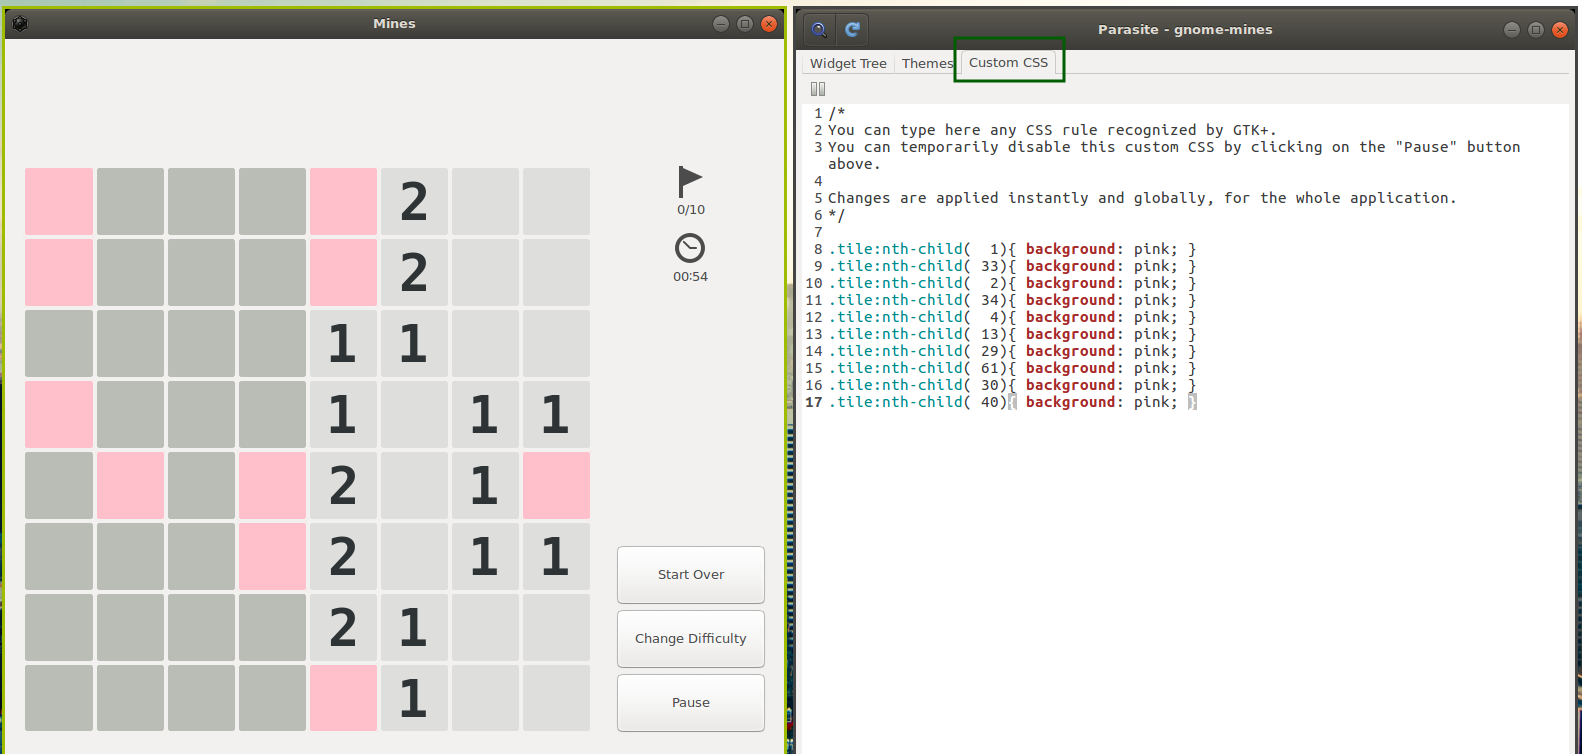
CSS beautification
A very nice feature of gtk-parasite is that it allows us to apply CSS styles globally per application or individually to each of its elements. GNOME developer center provides a good overview of CSS features supported in GTK+.
- In this case we need a way to apply a style to an invidual Tile, identified by its [x,y] coordinates. For this we need to identify which child number each tile has, then apply the style to n-th child. For example to apply a CSS to the element at [0, 1], we would do the following:
.button:nth-child(1) {
    background: pink;
}
- After correctly identifying the status of each square, with some CSS hacking we assign colours individually. For the example above, the stylesheet (which is saved to gtk.css file) is:
.tile:nth-child(  1){ background: pink; }
.tile:nth-child( 33){ background: pink; }
.tile:nth-child(  2){ background: pink; }
.tile:nth-child( 34){ background: pink; }
.tile:nth-child(  4){ background: pink; }
.tile:nth-child( 13){ background: pink; }
.tile:nth-child( 29){ background: pink; }
.tile:nth-child( 61){ background: pink; }
.tile:nth-child( 30){ background: pink; }
.tile:nth-child( 40){ background: pink; }
- The final product after applying the styles looks like this:
Next steps
If instead you’re interested in a Windows based reverse engineering ransomeware hands-on tutorial and want learn to reverse and decrypt some ransomware along the way, check out this course! Very recommended for intermediate and advanced. Or, if you’re interested to cover the basics, see this one.